Contact me at: rrcp@mts.net or by phone 204.878.2524

Join in the conversation on our
Facebook page

Lots of stuff goes on in this shop, located in Lorette, Manitoba.

Primarily it's the building and repair of classic wood & canvas canoes, and the making of premium canoe paddles. I also do custom boat building, composite fabrication, and special projects. A growing passion of mine is the making of classical guitars, I'll post about that, too.


I want to be able to share with my clients the progress of their commissioned work. Later I started thinking that there might be other people who are interested in what goes on inside a wooden canoe shop operated by an artist and a recovering teacher.

If you have any questions please feel free to contact me by email, phone, or by post. My mailing address is:

Red River Canoe & Paddle
24249 River Rd
Lorette, Manitoba
Canada
R5K 0Z6


Tuesday 30 June 2009

There are a lot of Brigden canoes around in Manitoba. Bill was a local paddling athlete, specializing in flat water canoe and kayak racing. He even competed in the 1952 (Helsinki, Finland) Olympic Games for Canada.

Read more: http://bkocay.cs.umanitoba.ca/rivers/brigden/brigden.html

Bill became best known for his canoe building. Applying his racing experience he designed and built hundreds of fiberglass canoes. His most popular canoe is the recreational M3, of which he built over 600, and he would sell them for about $850.

Bill's approach to building would best be described as pragmatic. Simple, effective, and cheap are the operating principles.

This canoe is in for sanding and re-varnishing of the gunnels and other trim pieces. Also, the seat frames need new webbing. Bill used old lawn chair webbing. That is a plastic that breaks down significantly over time with exposure to UV light.


The wood grain decks are actually Formica.

The seat frames are often old, broken, hockey sticks, good Ash wood available for cheap from local hockey rinks. I've repaired many of these seats and you can still see the labelling on the bottom of the seats.

Bill's canoes always had foot braces. He was way ahead of his time in this regard, unfortunately, most paddlers have no idea what they are for and the bar is often removed by the owners.


The flotation in the chambers is just foam blocks stuck into a garbage bag to keep it all together. Necessary when the chamber is not water tight like most modern canoes.

The end of the outer stem was pretty punky, as were two rib ends. so the had to be cut off and repaired.

The ribs are elm, but some of them were replaced with Oak ribs back in the '40's. Here are the two that had to be repaired. I forgot to get photos of the "After" state.

There are hundreds and hundreds of copper nails holding this canoe together, and most of the nail heads are covered with crud, or, at best, tarnish. Some, but not all of them, cleaned up when I sanded the hull. So I had to go in and clean up all the rest.

Before:

After:

After much experimentation, the Dremel with a round steel cutter, turned out to be the tool of choice.


Saturday 27 June 2009

The Panormo guitar now has a bridge made! Nylon string guitar bridges pre-Torres, were not the tie-block style that we are familiar with today, but rather used pins like we we see used on steel string guitars.

This is what the original looks like.

The strings would have used the rim of the bridge as a saddle, I decided to make a saddle that I can adjust, but would still blend in. There is still some final shaping and detail work to do, but its mostly done. I have some rosewood pins with pearl dots ordered, once they are here I can finish.

This bridge has not had the final holes drilled yet, these are just pilot holes.


The original used pearl for decoration on the wings, I used some figured maple.


It will look something like this when it gets glued on.

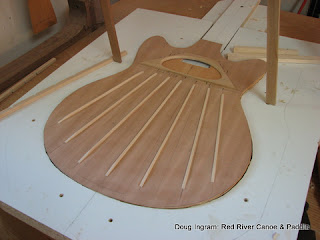
Inspired by this old guitar by Spanish luthier Vicente Arias, I am trying to apply this bracing pattern to my new guitar. If it will work well remains to be seen. This is not to cast comment on Arias, but my understanding and application of Arias' approach.


Basically, 7 small fan braces (4mm x 4.5mm) with 2 larger transverse braces, one on either side of where the bridge is located.


While the exterior is easier to sand than the interior, it still is taking quite a lot of time and sandpaper! The exterior will also be epoxy sealed. Sealing both the interior and the exterior will keep the wood in balance in regards to moisture content.


Here is the Peterborough Lake Queen finally finished, all clean, and ready for finishes. The dark on the right side is were an old repair was done back in the '40's, instead of using white cedar, red cedar was used.


After 2 coats of epoxy for sealer. This canoe won't be used much, so the epoxy is used to seal the wood and the seams under the varnish.

The colour is restored! The ribs do not yet have any finish on them. The varnish will make them look much like the planking.

Friday 26 June 2009

Update: I'm STILL sanding that Peterborough. Progress has been made, though, now I'm sanding the outside.

I think that I've figured out why it doesn't sand well, they must have bathed it in linseed oil. So many of these old canoe the finish just goes gummy when you try and sand it, and no amount of stripper gets out that last "in the wood" layer.

Oh joy.

Pictures later.

Friday 19 June 2009

Starting to make some progress on stripping out the old Peterborough. What a job this is! Yesterday I applied stripper again and scraped out the entire canoe for the second time. Then used a small pressure washer to clean out the gunk.

Today I tried scraping and sanding it clean. Not much success until I tried a small diameter flap sander on the drill. You can see the spare in the center of the canoe. Spent about 5 hours on this step. Now I have to finish sand the cedar because this tool leaves a lot of scratch marks.

Thursday 18 June 2009

This is what I am working on now. It is an old Peterborough "Lake Queen" dating from a long time ago. There were some repairs done on it in the '40's, so that's a clue.

The gunnels are shot, and the finish is done for, but the woodwork is pretty good, in general.

The interior will be the most work. Lots of varnish stripping, scraping, and sanding. Three days worth, at least. Lots of fun.

Coming along.

Its looking better, but there is still lots of varnish residue that I will have to go and reapply stripper to. Smelly chemicals and I'll have to use a respirator.

Just did a survey on this old Tremblay flat transom canoe. It had some previous repairs attempted.

Somebody thought that the best way to replace the rotted transom was to cut the whole thing off! What were they thinking?

I had a little early Father's Day gift, a few hours of guilt free time to work on my guitar building! I decided to use it to get the rosette done on a new project. This one gets a "D" shaped soundhole, and the router template is used for one half at a time, then flipped and the other half is done.

It looks like this when done.

I've wanted to do a braided copper wire for awhile and decided that this was the project to do it one. the darker area is shellac to keep the cedar from soaking up the black pigmented epoxy. It mostly worked, I had only a little bleeding of colour. Not yet sure whether I will just suck it up and live with it, or darken the soundboard to minimize its appearance. I was leaning to a darker look anyway.

Sanded smooth, it looks like this with a shellac wipe.

Detail.

I'm exploring making one of my traditional paddles, in this case a Voyageur Classic, as an ultralight paddle. It is mostly cedar, so some reinforcing is required for it to holdup to the stress of harder use. A light weight 2 oz. fiberglass is applied around the shaft and on the blade.

Epoxy is applied and the glass goes transparent. This paddle is a project for myself, so its gets done in the inbetween times in the shop. I'll post more on it as it progresses.

More gunnel repairs...Sometimes you need to be careful about who you lend your canoe out to.


A strong, straight piece of wood needs to be clamped into place. A straight piece of wood is used to make the repair, and the curve is produced by the bending force that results after the brace wood is removed.

Epoxy is used to ensure that the wood repair is well bonded. Its difficult to get furniture grade joints done in these instances, so gap filling is a positive attribute. Lots of clamps are used, not to make for super clamping pressure but for an even distribution of the clamping pressure.


Done, just need to clean the surfaces and sand them smooth.

The tips of the gunnels take a lot of wear and tear, so I put these brass gunnel tip protectors on. I start by cutting the brass plate to the correct dimension, round the corners, the clean up the edges. Then a bend needs to be made, and the screw holes drilled.


Finished and ready to install on the canoe...


...and this is how the look on the canoe.

Friday 5 June 2009

The challenge with building a new guitar model is that not all the jigs and fixtures that apply to the other guitars apply to the new one. The new guitar that I am making utilizes a tilted soundboard to allow for the elevated fingerboard. So I have to make a whole new solera, and I have to figure out how to do it! These are the challenges that make the guitar building so appealing.

I need to set the dished portion into a panel so that the mold rests level with the top of the work surface. There are a number of reasons why, but it would be too much to try and explain here.
I glued it in with epoxy.

Spring time also means seeding time. I managed to catch the seeding being done on the field across the road. No time to run out to my usual spot, but this will do.