Contact me at: rrcp@mts.net or by phone 204.878.2524

Join in the conversation on our
Facebook page

Lots of stuff goes on in this shop, located in Lorette, Manitoba.

Primarily it's the building and repair of classic wood & canvas canoes, and the making of premium canoe paddles. I also do custom boat building, composite fabrication, and special projects. A growing passion of mine is the making of classical guitars, I'll post about that, too.


I want to be able to share with my clients the progress of their commissioned work. Later I started thinking that there might be other people who are interested in what goes on inside a wooden canoe shop operated by an artist and a recovering teacher.

If you have any questions please feel free to contact me by email, phone, or by post. My mailing address is:

Red River Canoe & Paddle
24249 River Rd
Lorette, Manitoba
Canada
R5K 0Z6


Tuesday 27 October 2009

Kildonan canoes were made in Winnipeg for some 30-40 years. I don't know exactly when they started, but they closed down around 1979.

This Kildonan had been in the same family since the 1930's, and was last re-canvassed about 30 years ago by Daryl Perry. Daryl is a Winnipeg craftsman who was building and restoring canoes during the late 1970's. During the early 1980's he switched over to building classical guitars

http://perryguitars.com/

Sounds like a familiar story...


Time to put the trim back on the old Old Town (if that is what it really is...)

First, trim off the canvas.


Then repair the gunnels. One had a break, and the other had the rabbet lip worn out in a few places. I could have made new gunnels, but there is a charm in these old ones that cannot be replaced. They were in goo condition otherwise, and the repair work is almost invisible.

Before sanding:

After sanding:

My single Baidarka project is all planked up and mostly faired. It will have to sit and wait till I have some more time for it. I will need to do the final refinement of the fairing, then fill any plank seams and glass it.

This project used some old strip planking that I bought second hand. It looked better in the bundle, but after inspecting the individual strips it became apparent that some, actually quite a lot, of the milling was less than good. What this all means is that the strips did not match as well as they should have, and that there are more gaps than I would find acceptable for a bright (clear) finish. I was planning on painting the hull anyway, so no big deal.

I am still working out what I plan on doing with this kayak. I do intend this one to be a developmental project. That is, I will be trying out a variety of trim features, and I want the freedom to make changes over time. I am thinking that I will take a mold off of this hull and use it to build composite hulls and deck them with wood.

That can always change. I may choose to do nothing except paddle it!

Thursday 15 October 2009

I need some of my storage space back. I had set up to make this kayak some years ago and its been hanging around getting in my way ever since. Now is the time to put up or shut up, meaning that I either build it or take it down and forget about it.

So, after rubbing out the filler on the Tremblay Tuesday afternoon, I pulled the mold into the shop and started the kayak. This is how it looks at the end of Wednesday. I can't afford a lot of time for this project, so I am taking it in stages. I will get the hull planked and fiberglassed, then take it off of the mold, put it away till the next stage. Then I will take the mold apart and store some canoes for winter!

This is a kayak that I drew up the plans for about 7 years ago. It is based upon a single Baidarka, or Aleutian kayak. 17'6" long, 23" beam (if I remember correctly). I am building this one strip plank. I had had thoughts about pulling a composite mold off of this, that is why I had set up to build this way. We'll see how it is received and make decisions from there.

The gaps that you see will be filled in with solid wood and then shaped. The shapes at the extreme bow and stern are to complex for the strips to fill.

Got the filler on the flat transom Tremblay. Now I have to let it sit and cure. This one the owner is going to do his own painting and varnish in order to keep the costs down. Now that the bulk of the work is complete, I have yet to get new gunnels made and installed, then get the inner and outer keel on.

Saturday 10 October 2009

There is a new Archbishop for our Diocoese. He is an avid canoeist, so I had a paddle that was to be presented to him. This is his coat of arms that I painted on to personalize the paddle.

And while I was making guitar bridges, I finished the bridges for the other guitars. The humidity is holding out at 50%, so its a good time to get this done.

After the hull is faired and has the linseed oil applied, its time to canvas. With the Full transom on this canoe, the piece of canvas that I have isn't long enough to sling up like a hammock like I usually do, so I had to do it bottom side up. Some people prefer to do it this way all the time.

The canvas is folded over the transom and secured. This will also get filler, and the whole area will be covered by a plywood transom cap.

This is all that I can get done this week, the filler will have to wait till after Thanksgiving.

The new rib is fastened into its proper location. The old planking was left on for now, in order to keep the ribs properly aligned, it will be removed one piece at a time as the new planking is installed.

The new planking is fitted so that the joints are staggered, that is, so that they do not all fall on the same rib. The new transom is fitted as well.

Done. Looks pretty good.

And now its time to turn some attention to the deck and stem area.

Opened up and trim off the junk wood. Sorry, I didn't get a photo of the finished result.

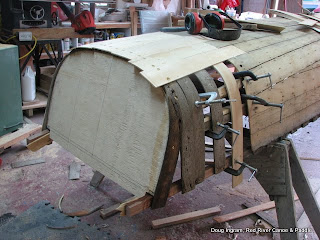
Time to get started on the Tremblay with the stern chopped off.


Step one, scarph on extensions to the gunnels to replace the sections that were cut off.


Always best to make the a little extra long, then trim them down to length.


I removed the old transom from the old ribs, put them in place...

Then steam bent a new rib to replace the one that was cut.

Dogsleds are not meant to be pulled behind snowmobiles, but that is what happened to this one. The owners grandchildren were having a bit too much fun. There are quite a few broken spots.


Especially the handle, which broke in two places. I'm not surprised considering how it is made! It is a square piece of Oak with kerfs cut in, then bent and wrapped with black electrical tape.


This sort of bend is difficult to control properly, so I used a simple mold clamped in place to ensure a fair bend as I glued it back in place. Later, a laminated three strips of wood to the inside of the bend. Its very solid now.

Canvass is on the Old Town, though I'm starting to think that this may not really be an Old Town, even though everything about it says "Old town". The real problem is that there is no serial number, no trace of the decal on the bow deck, and there are hex bolts instead of diamond head carriage bolts being used for the seats and thwarts.


I've been making step by step progress on the guitars.

For my double cutaway, I have ebonized the bindings, inlaid the back, built up the finish, and made the bridge (simply laid in place for the photo) I will not be ebonizing the bindings of any future guitars! While the black is good, it is extremely difficult to keep a clean and precise look to the work.

The back turned out well. Once I had the idea in my head,"This inlay would look good on the back fo the guitar...", well, there was not way to get it out except to inlay the back.

And the bridge. I started off by making a perfectly good tie block cap, then decided that it needed something to match the rosette, so MORE work! I'm glad, it looks pretty good.